Progressive Web App’s (PWA) are an exciting method to create web-based apps that can be ‘installed’ on iOS and Android without going through their respective app stores and the hassle that goes with it.
If you are creating an HTML5 game with Game Maker Studio, this blog will show you how to convert it to a PWA so it can be installed on a desktop or mobile device and work offline.
I have a GitHub repo of the finished project. It consists of a simple game called Point Jump where you tap to jump over incoming red lines. A high score is saved locally with an .ini file. Files in the ‘dist’ folder can be uploaded to a web host where the game can be installed from.
Here is a link to the published example game:
https://apps.mbmedia.co.nz/pointjump/
If you’re following along, export your game for the HTML5 platform into a folder named ‘dist’. We need to modify these files Game Maker creates to convert it to a PWA.
Adding files for a PWA
To start with, we need a manifest.json file that provides information such as the app display name, location, theme colours and icons.
This handy manifest generator is and easy way to create one.
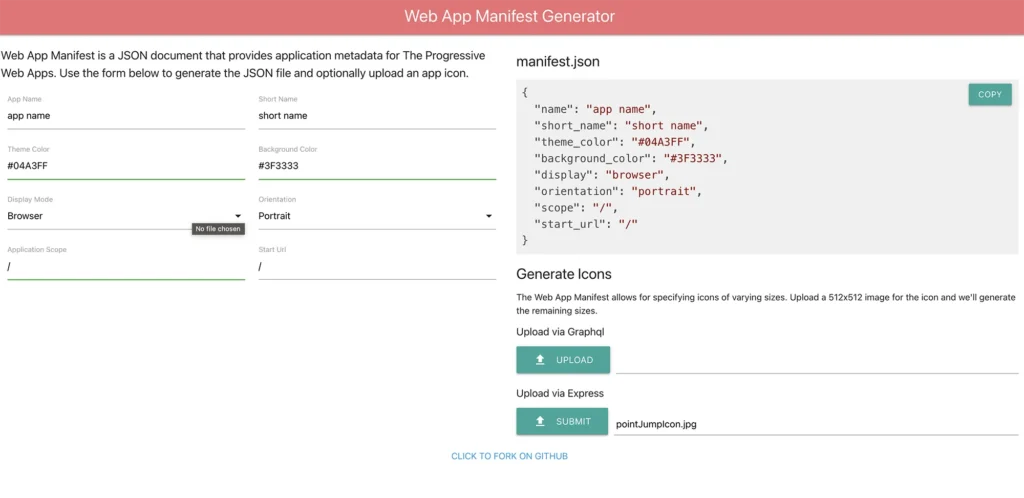
For the Display Mode, you can choose to have the app in fullscreen like a real app, or show a url bar:

The Application Scope and Start Url point to your game directory from the website root. If you aren’t placing your game in a subdirectory you can leave them as /.
Since my example game is in a subdirectory hosted at https://apps.mbmedia.co.nz/pointjump/ I need to use /pointjump/.
After adding an icon and clicking ‘Submit’ it will download a .zip folder with your manifest and required icos.
Extract the files and place them into your games ‘datafiles’ directory so they’ll be saved with your project:

You can view these files in Game Maker through the Asset Browser menu icon, and selecting ‘Included files’:

Custom index.html file
In the dist directory where your game has been exported, you’ll see the index.html file. Make a copy of it in your games ‘datafiles’ directory.
In Game Maker, under Game Options > HTML5 >General, choose this newly copied file called index.html as ‘Included file as index.html’.

Open up the copied index.html file to edit it, I’m using Visual Studio Code.
In the <head> tag, add the following line to link our manifest file (after <meta charset="utf-8"/>):
<link rel="manifest" href="manifest.json">Service Worker
Now we can create a Service Worker, a piece of Javascript to store the game files when the app is downlaoded.
Create a new file in your ‘datafiles’ directory called serviceWorker.js and add the following:
const cacheName = 'PWA-v1'

self.addEventListener('fetch', (e) => {
    e.respondWith((async () => {
        const r = await caches.match(e.request);
        console.log(`[Service Worker] Fetching resource: ${e.request.url}`);
        if (r) return r;
        const response = await fetch(e.request);
        const cache = await caches.open(cacheName);
        console.log(`[Service Worker] Caching new resource: ${e.request.url}`);
        cache.put(e.request, response.clone());
        return response;
    })());
});
This creates a cache, and when the app requests a resource, serves the file from the cache instead of the internet, allowing the app to work offline.
If you add new files to update your game, change the cacheName to invalidate the old cached files.
Next we need to link this new file in our index.html file.
After the opening <body> tag, add the following script:
<script>
    // Register the Service Worker script
    if ('serviceWorker' in navigator) navigator.serviceWorker.register(
        window.location.href + 'serviceWorker.js'
    );
</script>
Note the URL – the serviceWorker.js file has to be placed in the root of your application* since it needs access to intercept all network requests.
Uploading your game
Now that we have created our files we need to export the game again so Game Maker will package our files together.
After exporting the game into our dist folder, move the two files serviceWorker.js and manifest.json out of ‘html5game ‘into the root directory so our index.html file can find them:

Installing the app
After uploading your files to a host such as Render, Cloudflare Pages, or your own host – or perhaps using my hosting service mbmedia.co.nz, once you access your game online you will be able to install/download it.
With Google Chrome on a computer/Android device, you can click ‘install’ in the URL bar:

On iOS you have to use the Safari browser and click the webpage Share Options >Add to Homescreen:

Conclusion
It’s not too hard to convert an HTML5 Game Maker game into a PWA and offers the benefit of playing your web games offline and skipping the App Stores.
I hope you found this guide helpful, and my other post Optimising GameMaker Studio 2.3 for HTML5 web and mobile games can help offer HTML5 improvements.
Further Reading
- https://developer.mozilla.org/en-US/docs/Web/Progressive_web_apps/Offline_Service_workers
- https://github.com/mdn/pwa-examples/blob/master/js13kpwa/sw.js
- https://firt.dev/pwa-2020